

RBAC built for the people who run a PAM platform
Every security platform has user roles. Most do the minimum — admin, operator, viewer, maybe a custom role tier — and call it RBAC. That works until you’re running a real PAM and User Activity Monitoring deployment, at which point you need to express things like: “Sarah can view monitoring results for the Finance Client group but not Engineering, can’t see clipboard text, can approve One-Time Password requests, can’t disable the default admin, and her permissions inherit from the Supervisors user group except when overridden by her own grants.” Generic RBAC doesn’t fit that shape; you either over-grant and hope, or you write workarounds. Competitors at this layer — CyberArk Privilege Cloud, Delinea Secret Server, BeyondTrust Password Safe — handle similar problems with their own permission models, but with varying granularity. Syteca’s permission model is built around exactly the operations a UAM/PAM admin needs: seven administrative permissions that gate platform-wide actions, six Client permissions that gate per-Client operations, User-to-User access scoping for restricting which endpoint users’ monitoring results a Management Tool user can see, and three user types (internal, Active Directory, application account) that share the same permission engine.- Implement separation of duties between platform admins, investigators, and operations staff — with permissions granular enough to express the real boundaries.
- Inherit AD user groups automatically — domain group → Management Tool user group → user, so new hires get correct access on day one.
- Restrict which endpoint users a given investigator can monitor (the “User-to-User” model) — useful for legal-team segmentation, regional separation, or contractor isolation.
- Enforce 2FA per user — TOTP via any authenticator app — with admin-managed reset for lost devices.
- Harden the default admin by disabling it entirely once other Administrators are configured — eliminates the “default admin compromise” attack surface.
- Wire applications into Syteca via Application Account users through the Application Credentials Broker for service-to-service automation.
The default admin and tenant model
By default, Syteca ships with one administrator — loginadmin, password set during Application Server installation. The default admin has every permission required to work with the system and is the technician in Multi-Tenant mode, with the ability to create tenants. Once another admin is configured, the default admin can be disabled to harden the deployment.
Three user types
Four default user groups
Every Syteca deployment ships with four user groups:Permission inheritance
A user can belong to multiple user groups. When a user is in a group:- They inherit every permission granted to that group.
- Inherited permissions can only be removed by removing the user from the group — they can’t be revoked individually on the user.
- The user can also have their own permissions in addition to inherited ones.
Open the Users page
Sign in to the Management Tool, click Users in the left navigation. Users are listed grouped by the user groups they belong to. Each row shows: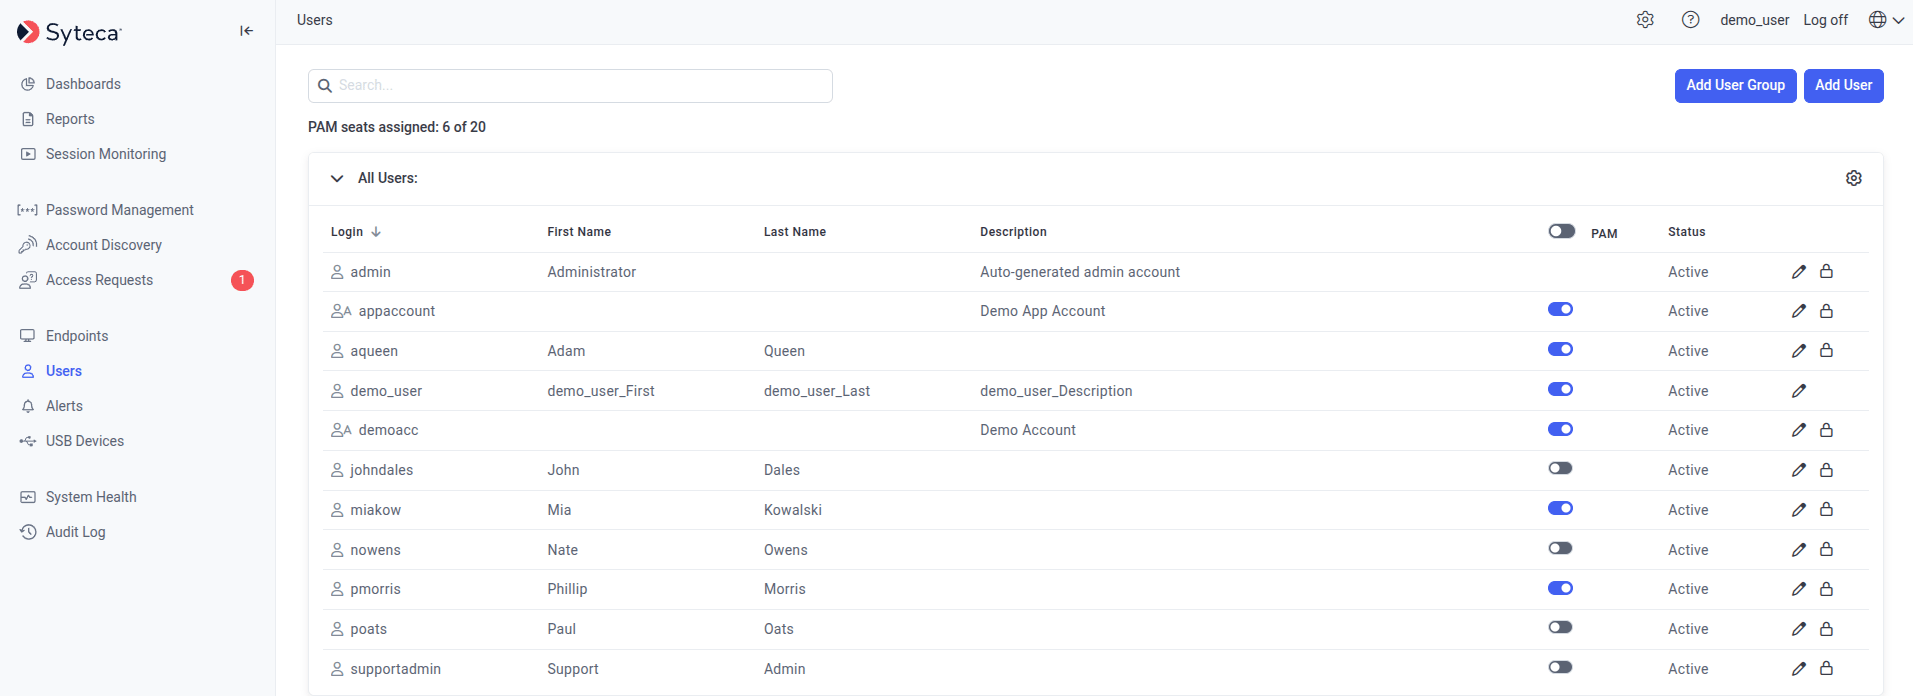
The Users page - users listed under the groups they belong to, with PAM seat toggle and lock/unlock status visible per row.
Add a user
Open Add User
Pick the user type
- Add an Internal User — create a local Management Tool account.
- Add an Active Directory User / User Group — add an existing AD user or user group.
- Add Application Account — create an account for the ACB API. Not available in SaaS.
Fill in user details
- Internal user
- Active Directory user/group
- Application Account
- Login — must be unique. (In Multi-Tenant mode, users of different tenants can share the same login.)
- Password — at least 8 characters, with at least one lowercase letter, one uppercase letter, one numeric character, and one special character. Cannot contain more than 3 consecutive identical characters or the user’s login name.
- First Name / Last Name / Description — optional, max 200 characters each.
- Email — required for the user to receive an automatically generated one-time password.
- Enable two-factor authentication on login — force the user to set up TOTP 2FA on first sign-in.
Assign user groups
Set administrative permissions
Set Client access
- Click the Edit Permissions icon on the right.
- In the Client Permissions window, select which Client permissions to grant.
- Click Save.
(Optional) Set User-to-User access
- Click Add User on the right.
- Pick the Domain / Computer Name and User / User Group from the drop-downs. Use
*as a wildcard. - Click the Add icon to commit.
(Optional) Assign a PAM seat license
Finish
Edit a user
Open the user
Make your changes
Reset 2FA (if needed)
Save
admin user, the Disable User button replaces Delete User — see Disable the default admin.Lock and unlock users
User accounts can be locked automatically (after too many failed sign-ins — see Brute-force lockout) or manually by an administrator.- Lock a user
- Unlock a user
Delete a user
Open the user
Delete
Confirm
admin user can’t be deleted — use Disable the default admin instead.Disable the default admin
The defaultadmin user has unrestricted access to everything in Syteca — useful for initial setup, a meaningful risk during operation. After initial deployment, security-conscious organizations disable the default admin entirely and rely on other Administrators users (each with auditable, configurable permissions) to operate the platform.
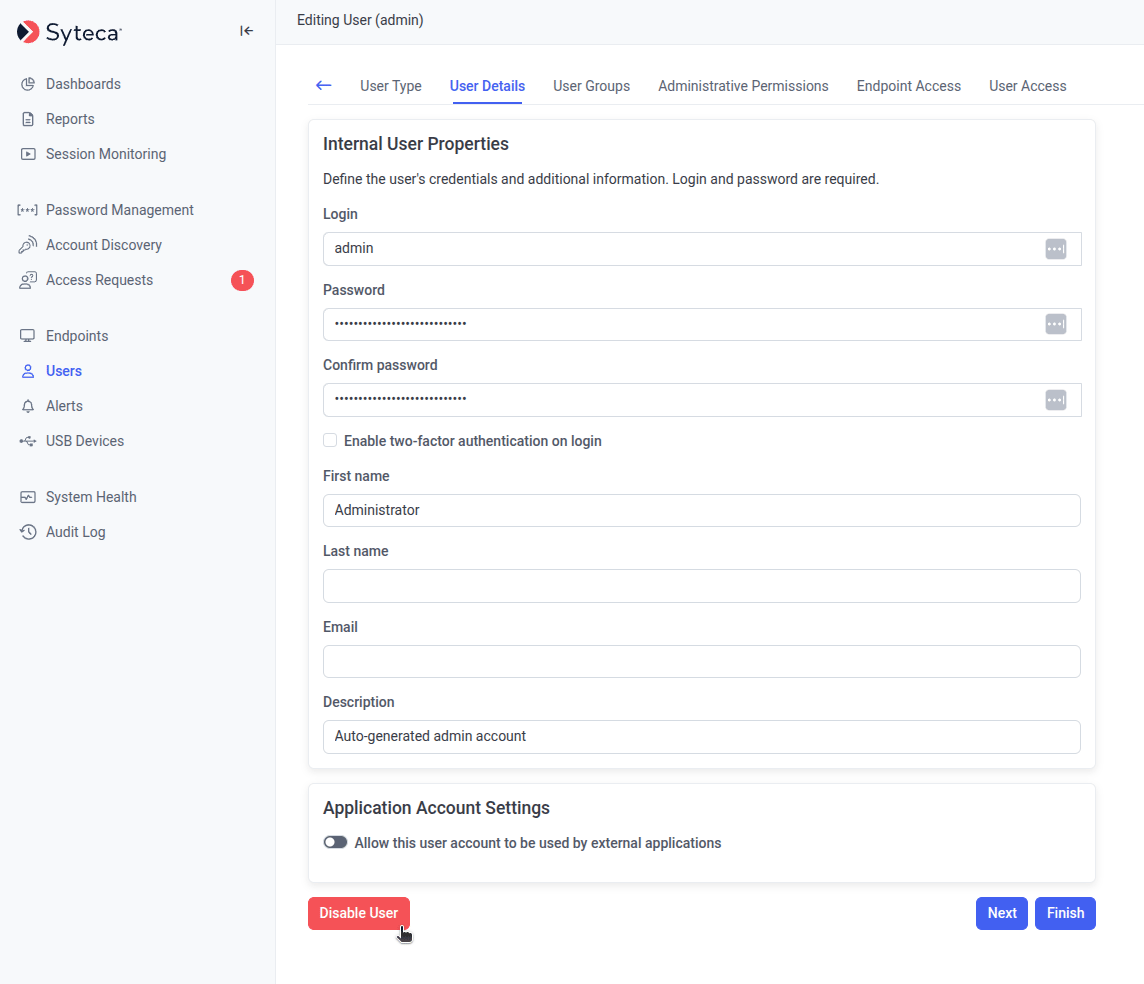
On the default admin user's Edit page, the Disable User button replaces the Delete User button - and only appears when another Administrators-group user exists.
- Eliminates a known, high-value credential target (the literal
adminaccount). - Forces all administrative actions through accounts that show up in the Audit log by name.
- Meets compliance frameworks (NIST 800-53 IA-4, ISO 27001 A.9.2) that restrict generic admin accounts.
- Required by some Pseudonymizer / regulatory deployment patterns.
Prerequisites
Before disabling the default admin, at least one other user must be added to the Administrators user group — either as an internal user, an AD user, or via membership in an AD user group added to Administrators. Additionally, the default admin can’t be disabled while they’re the sole owner of certain options or rules. Address these first:Disable the default admin
Sign in as another administrator
Open the default admin
admin user.Click Disable User
Confirm
Restrictions after disabling
Disabling the default admin changes the behavior of several features:Add a user group
User groups work the same way as users — same Client Access, same Administrative Permissions, same User-to-User access mechanism. Users in a group inherit the group’s permissions.Open Add User Group
Set group properties
Add members
Set administrative permissions
Set Client access
(Optional) Set User-to-User access
Finish
Edit a user group
Open the group
Make your changes
Save
Delete a user group
Open the group
Delete
Confirm