

Find every privileged account — even the ones you forgot about
You can’t protect what you don’t know exists. Most organizations have far more privileged accounts than the spreadsheet says: domain admins created during long-forgotten projects, local administrators left on every server image, service accounts spun up by automation,root accounts on Linux hosts nobody’s logged into for years. Each is a blind spot — a credential nobody is rotating, monitoring, or auditing.
The alternative most teams default to is a tracking spreadsheet, a few one-off PowerShell scripts, and an annual review that’s out of date the day after it ends. Syteca Account Discovery replaces that with continuous, automated scanning across your Active Directory, Windows, and Linux estate — and onboards what it finds into the vault as managed secrets, even when you don’t currently know the account’s password. The existing credential is rotated during onboarding, so the moment an account enters the vault, only Syteca knows it.
Use Account Discovery when you need to:
- Build a complete, continuously-refreshed inventory of privileged accounts across AD, Windows, and Linux — without manual spreadsheets or one-off scripts.
- Onboard hundreds or thousands of accounts into PAM in a single pass, instead of adding each one by hand.
- Catch newly-created privileged accounts on a schedule, so nothing stays unmanaged for long.
- Identify orphaned, stale, or unauthorized privileged accounts during access reviews.
- Meet the “discover and protect all privileged accounts” expectation in PCI DSS, NIST 800-53, ISO 27001, and SOC 2 audits.
The Account Discovery page is available only to Management Tool users with the Privileged Accounts Management administrative permission and a PAM seat license.
Discovery rule types
You discover accounts by creating and running rules of three types:For Active Directory and Windows local accounts to be discovered, the associated LDAP target must first be added on the LDAP Targets tab of the Configuration page.
View and edit rules
1
Open Account Discovery
Sign in with the Privileged Accounts Management permission, click Account Discovery, and select the Rules tab to see all rules.
2
Read the rule status
Each rule shows a color-coded status for its last run: Completed, Completed with errors, Canceled / Not executed, or In Progress. The Type column shows an Active Directory, Windows, or Linux icon. Last Run Time and Next Run Time (if scheduled) are also shown.
3
Edit a rule
Click anywhere on a rule’s row to edit it (or delete it with Delete while editing).
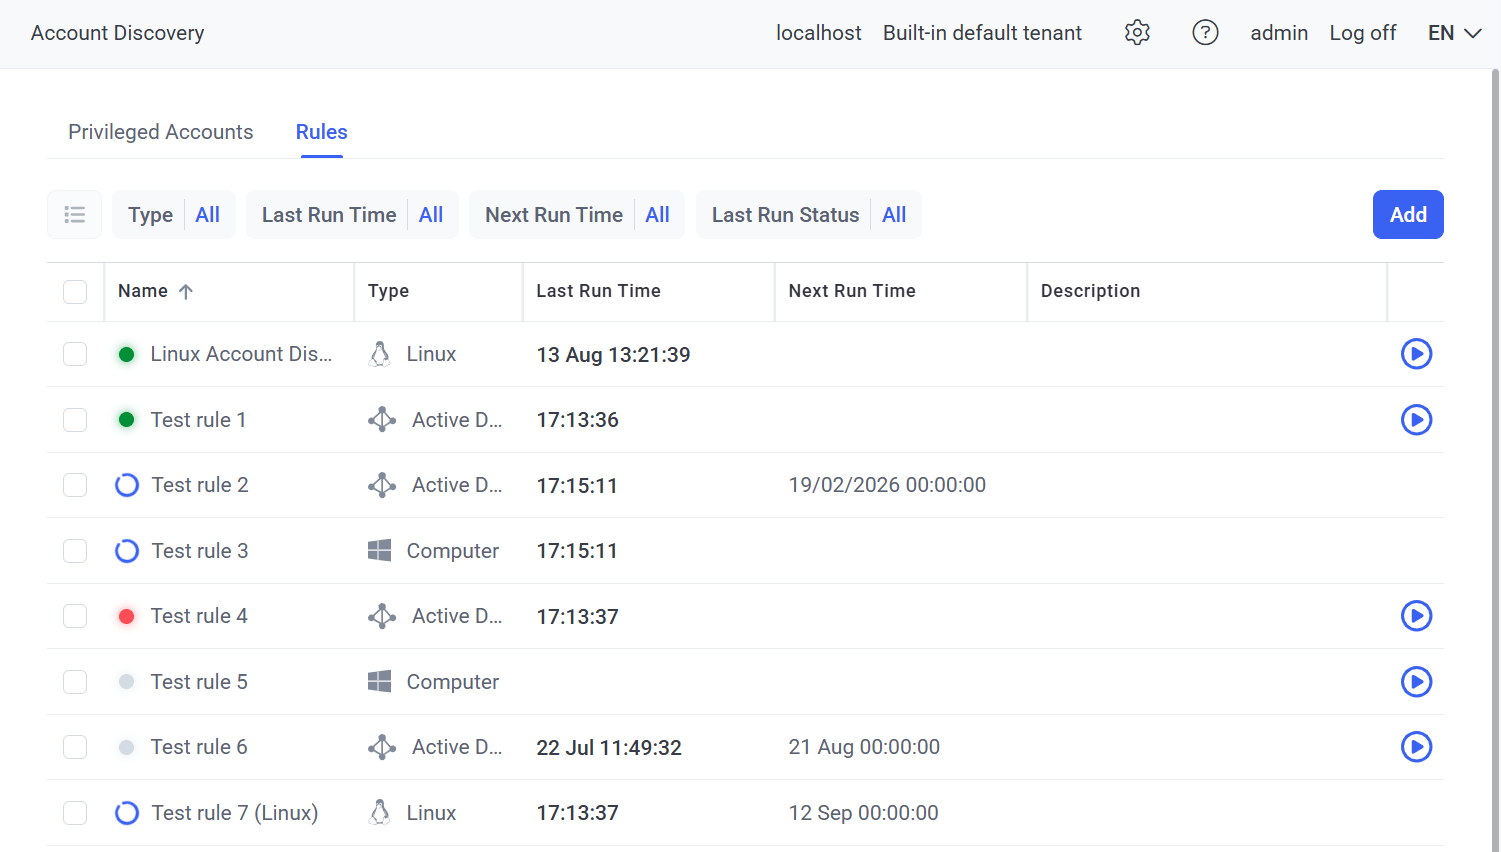
The Rules tab on the Account Discovery page.
Add and run a rule
1
Start a new rule
On the Rules tab, click Add.
2
Set the General options
Enter a unique Rule name and optional Description, then choose the Type:
- Active Directory Discovery — AD users in the Domain Admins or Enterprise Admins group.
- Computer Discovery — Windows local accounts with Administrator permissions or GPO-granted privileges (for example,
SeTcbPrivilege,SeBackupPrivilege). - Linux Discovery — Linux accounts; choose All Accounts (privileged, service, application) or Privileged Accounts (manually created non-daemon accounts and
root), and optionally include accounts with Public SSH keys.
3
Set the scope
- Linux Discovery: enter an IP range for scanning (for example
10.100.10.10-10.100.10.40) or a semicolon-separated list, and choose the Account type. - Active Directory / Computer Discovery: select the Source domain (from added LDAP targets) and optionally restrict to specific OUs or groups.
4
Select the account to scan with
In Select account to use for scans, choose the secret(s) to run scans under (you need the Owner or Editor Role Type):
- AD / Computer Discovery: one Active Directory or Windows account secret.
- Linux Discovery: one or more Unix account (SSH) secrets with private SSH keys.
For security, only Unix (SSH) secrets with private SSH keys can be selected for Linux scans, and they must have passwordless sudo configured to discover Linux accounts with public SSH keys. You can also click Add Secret at the top of the drop-down to create one.
5
Select the account to scan with
In Select account to use for scans, choose the secret(s) to run scans under (you need the Owner or Editor Role Type):
- AD / Computer Discovery: one Active Directory or Windows account secret.
- Linux Discovery: one or more Unix account (SSH) secrets with private SSH keys.
For security, only Unix (SSH) secrets with private SSH keys can be selected for Linux scans, and they must have passwordless sudo configured to discover Linux accounts with public SSH keys. You can also click Add Secret at the top of the drop-down to create one.
6
Schedule (optional)
Enable Scheduled Discovery to run scans automatically — set Recurring scans every (days or hours) and a Start at time (for daily scans).
7
Set notifications (optional)
In Actions, select users to email when new accounts are found. They must have an email address in their user account.
8
Save and run
Click Save. To run a rule manually, click its Start icon, or select several rules and use Bulk Action → Start. (Bulk Action → Remove deletes rules without deleting the accounts they already discovered.)
When a rule runs
Each run creates an Account Discovery task on the Tasks List tab of the System Health page, where you can cancel it (while Queued or In Progress), download its log (when Finished or Failed), or remove it. When the task finishes, the notification email is sent.Why a discovery task might fail
Why a discovery task might fail
- The scan secret’s most recent password/SSH key rotation failed.
- The credentials stored in the scan secret are invalid.
- The scan secret is checked out by another user.
- The account in the secret lacks the required domain admin privileges (Domain Admins / Enterprise Admins).
- The associated LDAP target no longer exists.
View and manage discovered accounts
On the Privileged Accounts tab (with Active Directory, Windows Local, and Linux sub-tabs), discovered accounts appear in a grid showing Login, User Name, Type (Linux only), Status, Computer (Windows/Linux), Discovered time, Last Onboarding Time, Secret Name, and Discovery Rule. Account statuses:
Using Bulk Action, you can Remove Unmanaged/Expired/Skipped accounts, Skip Unmanaged accounts, or Restore to Unmanaged any Skipped accounts. Managed and Onboarding-in-Progress accounts have no checkbox (delete the secret to restore them to Unmanaged). Use the Search box (Login, User Name, Computer, Secret Name) and filters to narrow the list.
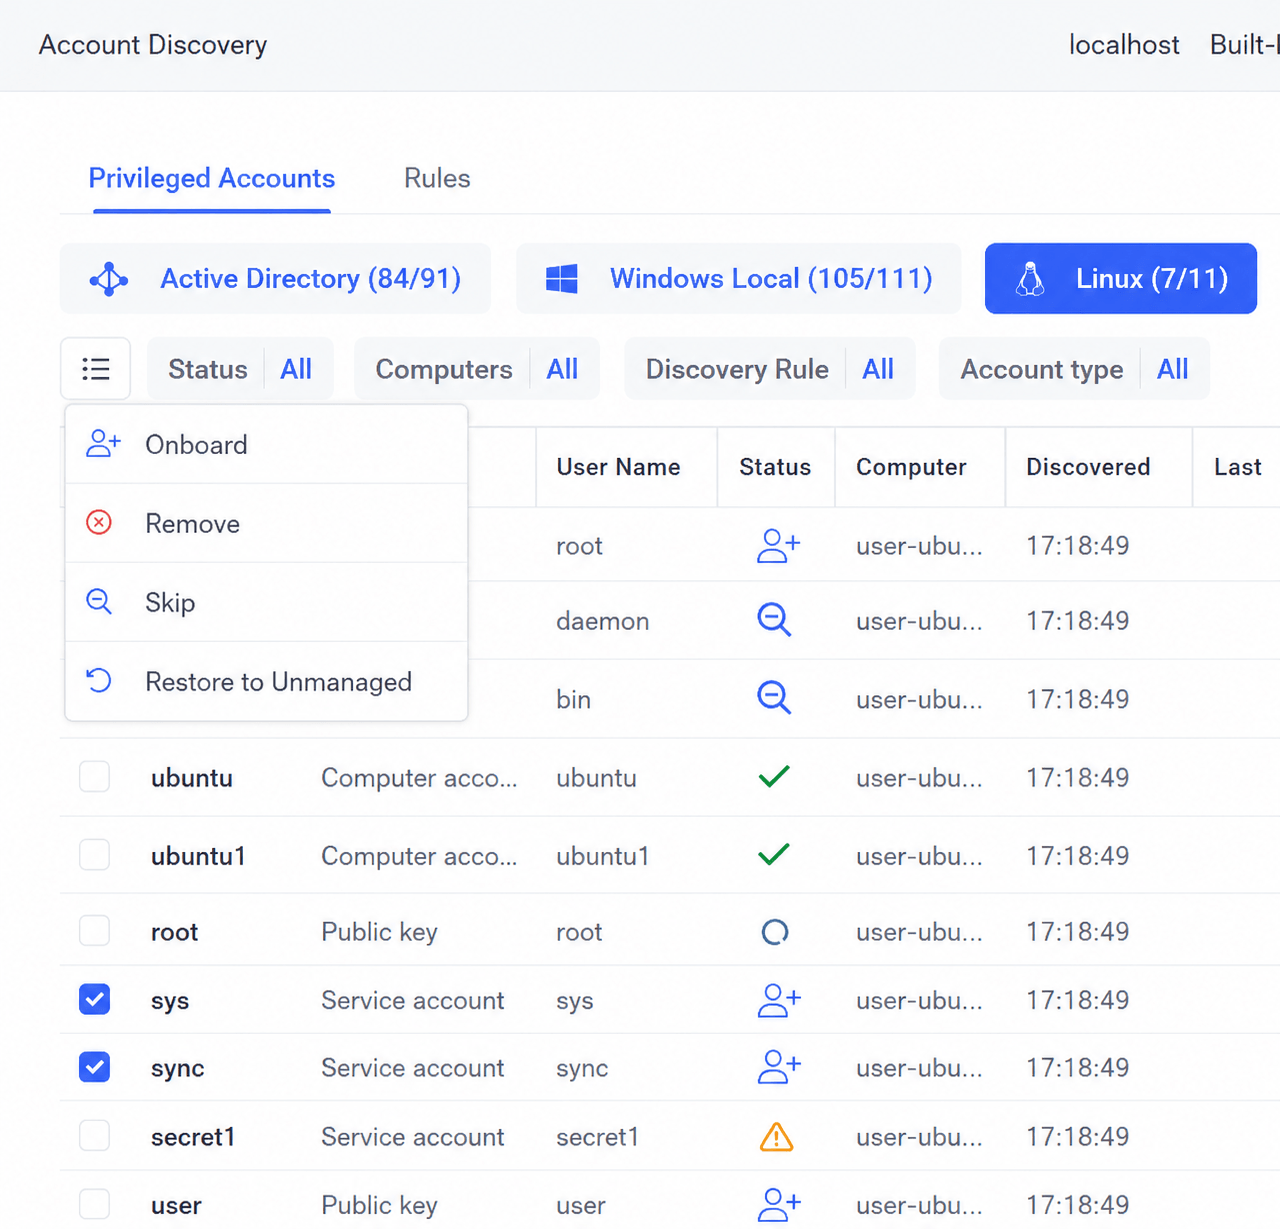
Discovered accounts on the Privileged Accounts tab.
Onboard discovered accounts
1
Select accounts to onboard
On the Privileged Accounts tab, either click an Unmanaged account’s status icon to onboard one, or select several Unmanaged accounts and use Bulk Action → Onboard.
With Bulk Action, Linux “Public key” accounts can’t be selected together with Computer or Service accounts.
2
Set the secret properties
In Onboard Account(s), set the Secret Name (auto-generated for bulk onboarding, e.g.
$DOMAIN\$LOGIN, $COMPUTER\$LOGIN) and optionally Change the destination folder (one you have Owner/Editor permission for).3
Choose the password settings
Pick one:
- Use automatically generated password (forced for Bulk Action).
- Use current password (not rotated during onboarding; not available for Linux service accounts).
- Specify new password manually (rotated during onboarding).
- Import Private Key (Linux accounts with public SSH keys).
4
Choose the rotation account
Unless using the current password, set Account(s) for Rotation — a secret you have Owner/Editor permission for (AD/Windows account secrets for AD/Windows accounts; Unix SSH secrets with private keys for Linux). Or, for non-Linux accounts, Enter credentials manually for an account with local admin privileges.
For Active Directory accounts, rotation during onboarding uses the account defined in the associated LDAP target. With an automatic LDAP target, the server service must run under a domain admin account.
5
Configure the rest and onboard
Set the Automation, Security, Permissions, and Restrictions tabs as when adding a secret, then click Onboard.
6
Track progress
Watch the Account Onboarding tasks on the System Health Tasks List tab. When finished, the account shows Managed on the Privileged Accounts tab.
Related
Password Management
What discovered accounts become once onboarded — rotation, brokered access, audit.
Add a secret
The full secret configuration reference used during onboarding.
Remote password rotation
Required on target hosts before onboarding.
Permissions for secrets
The Owner/Editor permissions needed for scan secrets.
Service Account Dependency Discovery
Track Windows services, scheduled tasks, and IIS pools tied to a discovered account.