

Recommended approach
Use automatic updates unless you have a specific reason to manage the schedule yourself. With automatic updates on, a Client picks up the new version the next time it connects to the Application Server after the server itself has been upgraded. No further action is needed for that Client. Use manual updates when you want to control the rollout - for example, to update a small pilot group of Clients first and the rest later.After a Client is updated, the monitored data it recorded before the update remains accessible.
Update automatically
Turn on automatic update for a single Client, or for an entire Client group at once.1
Sign in with the right permission
Sign in to the Management Tool as a user with the Client Configuration Management permission for Clients.
2
Open Clients
Click Clients in the left navigation.
3
Open the Client or Client group
On the Clients tab, click the Client’s name in the Client Name column. To configure an entire group at once, switch to the Client Groups tab and click the group’s name in the Client Group Name column.
Use the Search box and filters at the top of the page to find specific Clients (or the Search box at the top of the Client Groups page to find specific groups).
4
Enable automatic update
On the Editing Client (or Editing Client Group) page, on the Properties tab, scroll to the Client Mode section and select the Update Client automatically checkbox.
5
Finish
Click Finish in the bottom right.
The Client - or every Client in the group - updates automatically the next time it connects to an Application Server running a newer version of Syteca.
Update manually
Manual update is a two-stage workflow: first turn off automatic update on the Clients you want to control, then trigger the update from Bulk Action after the Application Server is upgraded.1. Disable automatic update on selected Clients
1
Sign in
Sign in as a user with the Client Configuration Management permission for Clients.
2
Open Clients
Click Clients in the left navigation.
3
Open each Client
For each Client you want to manage manually, click its name in the Client Name column. (Or open a Client group from the Client Groups tab to apply the change to all Clients in the group.)
4
Clear the checkbox
On the Properties tab, in the Client Mode section, clear the Update Client automatically checkbox.
5
Finish
Click Finish to save the changes.
2. Run the update after the Application Server is upgraded
1
Upgrade the Application Server
First, update the Application Server to the new version.
2
Open Clients
Sign back in to the Management Tool and click Clients.
3
Select the Clients to update
On the Clients tab, select the checkboxes next to the Clients you want to update.
4
Trigger the update
Click Bulk Action in the top left, then choose Update Selected Clients from the menu.
The selected Clients update to the latest version.
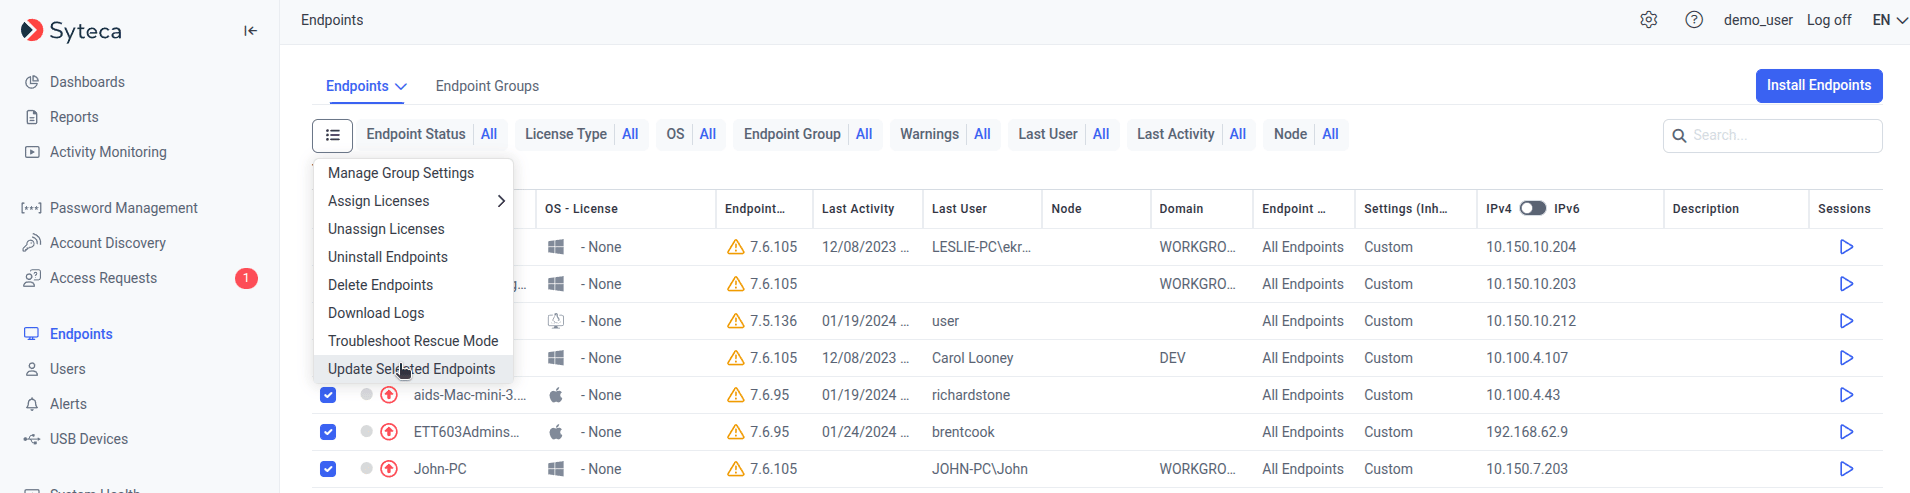
Triggering a manual update on selected Clients via Bulk Action.
What happens to a not-up-to-date Client
A Client that’s behind the Application Server version continues to monitor user activity and send data as normal - it just won’t pick up new features or fixes until updated. Each OS shows a different post-update status indicator (and Linux and macOS have their own troubleshooting cases). For OS-specific status meanings, see:Windows Client status
Up-arrow and orange warning triangle indicators.
macOS Client status
Includes Accessibility and Allow in Background fixes.
Linux Client status
Includes Rescue mode and Troubleshoot Rescue Mode.
Related
Windows Clients
Per-OS reference for Windows Client operation.
macOS Clients
Per-OS reference for macOS Client operation.
Linux Clients
Per-OS reference for Linux Client operation.
Update the Application Server
The server upgrade that triggers Client updates.