

Make employee monitoring legal in the EU — without losing the audit trail
Employee monitoring sits in awkward legal territory in much of the world. In the EU, the UK, Brazil, and an expanding list of other jurisdictions, recording an employee’s screen and keystrokes is broadly permitted only if you can demonstrate that personally-identifying information is protected, access to recordings is gated, and the people who can de-anonymize the data are separated from the people who routinely view it. Most monitoring platforms either ignore this entirely (and become unsellable in those markets) or recommend you “obtain written consent” and call it solved. Competitors like Teramind, Veriato, and ActivTrak have varying degrees of redaction features, but the deeper compliance pattern — strict separation of viewing and de-anonymizing permissions, evidence trail of every de-anonymization request, password-gated approval, and time-limited exposure — typically isn’t built in. Syteca Pseudonymizer is built around exactly that pattern. With it enabled, every Management Tool user sees randomized aliases instead of usernames, blurred screen captures, and hidden IP addresses by default. When an Investigator has legitimate cause to view the real identity behind a session, they raise an Expose Request. A Supervisor — a role that exists only to approve these requests, and cannot view sessions themselves — approves or denies, optionally requiring a password. The exposure is temporary (24 hours) and scoped to one user on one Client. Every step is logged.Use the Pseudonymizer when you need to:
- Deploy employee monitoring in GDPR-regulated environments (EU, UK, EEA) without becoming a compliance liability.
- Meet works council or labor union requirements that any employee monitoring system must obscure identities by default.
- Implement separation of duties between routine session viewing (Investigators) and identity exposure approval (Supervisors).
- Provide a legally-defensible audit trail for every time an employee’s identity was de-anonymized — who requested it, who approved it, when, and why.
- Maintain the business value of recording (incident investigation, dispute resolution, fraud detection) without the legal risk of viewing employee personal data without cause.
How pseudonymization works
When the Pseudonymizer is enabled, all existing personal data of endpoint users is pseudonymized (existing data is not deleted — access to it is restricted), and all new data is pseudonymized immediately as recorded. Three transformations:What’s affected when Pseudonymizer is on
The pseudonymization applies system-wide. Pages where you’ll see randomized aliases and hidden columns:- Client Sessions tab (Activity Monitoring page) — adds an Expose Request column on the right.
- Session Player — captures blurred per the rules above.
- Session Risk Score page.
- Dashboards (both system health and user activity).
- Alerts page and Alerts tab.
- Access Requests page.
- Audit Log page.
Features disabled in Pseudonymized mode
Some features are not currently compatible with pseudonymization and are hidden or disabled while it’s enabled:- Archived Sessions tab.
- File Monitoring tab.
- Forensic Export feature and Forensic Export History tab.
- User Behavior Analysis page (the UEBA feature itself).
- Reports page.
- Sending data via APIs.
- Master Panel stand-alone component.
The Clients page is not technically “supported” in Pseudonymized mode but remains accessible to users with the appropriate permissions — including the User-to-User restrictions in the User Access tab.
Three alert rule parameters cannot be used while Pseudonymizer is enabled: Username, User Belonging to Domain Group, and Computer Belonging to Domain Group. Alerts created with these parameters before enabling Pseudonymizer are automatically disabled.
Investigator and Supervisor roles
The Pseudonymizer is built around two complementary roles that cannot be combined:
This separation is the core of the compliance story: the person who decides to expose a user’s identity is not the person who routinely views the recordings. Both must agree before a real identity is revealed.
The de-anonymization workflow
Raising an Expose Request (Investigator)
1
Find the session
On the Client Sessions tab (Activity Monitoring page), locate the session you need to investigate. The user appears as a randomized alias (e.g.
USR-123).2
Click the Expose Request icon
In the Expose Request column on the right, click the icon next to the session.
3
Enter a reason and submit
In the Request to Expose User pop-up, enter a clear reason for the request, then click Proceed.
4
Wait for Supervisor approval
The request is routed to a Supervisor. You’ll be notified when it’s approved or denied.
What gets exposed (and what doesn’t)
After approval, for 24 hours, you can view:
The exposure is scoped to one endpoint user on one Client computer — not to all of that user’s sessions across the deployment.
Require a password to approve Expose Requests
To strengthen the compliance model (and prevent administrators who can reset Supervisor credentials from approving requests themselves), enable a de-anonymization password. Once enabled, Supervisors must enter this password every time they approve an Expose Request.1
Sign in as the built-in admin
The de-anonymization password can only be set by the built-in default admin user.
2
Open the Pseudonymization tab
Click Configuration at the top of the Management Tool, then select the Pseudonymization tab.
3
Enable password approval
Select Enable de-anonymization request approval using password. Enter the same password in De-anonymization password and Confirm password.
The password must be 14–50 characters, containing at least one lowercase, one uppercase, one numeric, and one special character (
., !, -, %, $, _, &, #, etc.). It’s stored in encrypted form in the database.4
Save
Click Save at the bottom of the page.
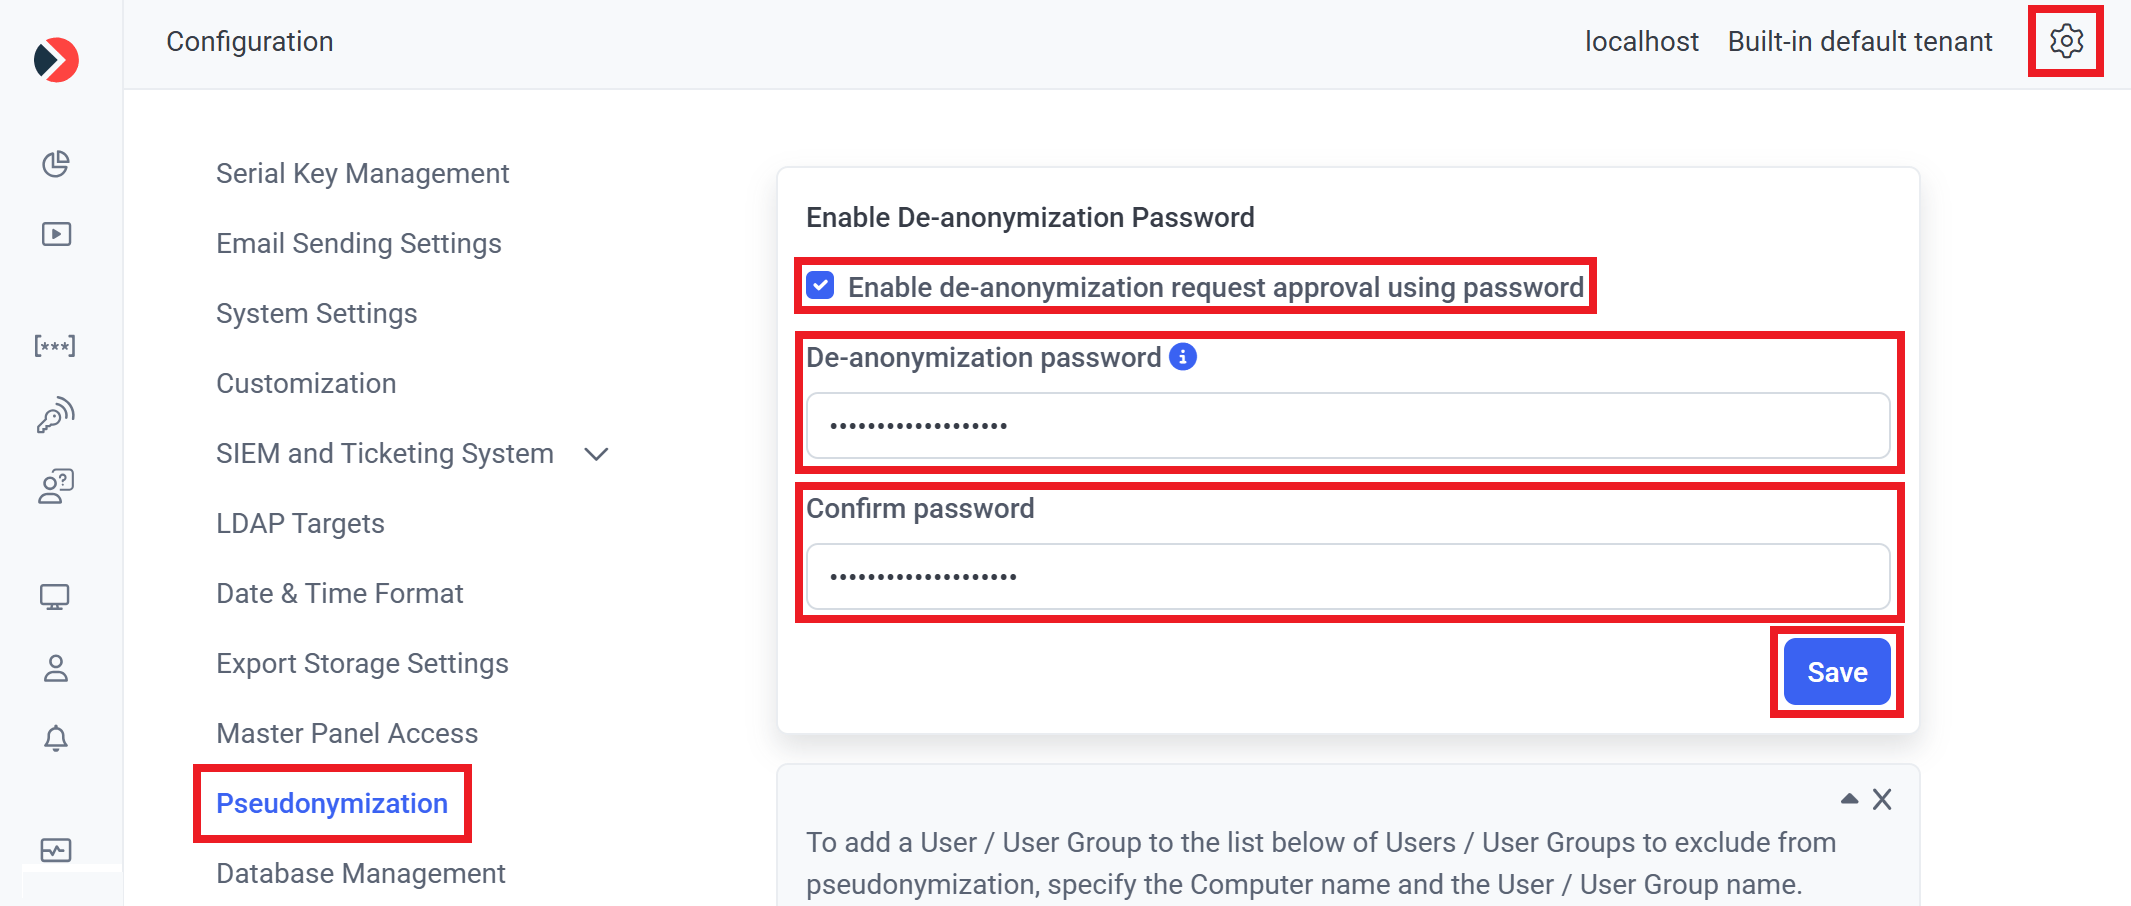
The Pseudonymization tab with the de-anonymization password configured.
Exclude specific users from pseudonymization
In some cases — third-party contractors, service accounts, test users — there’s no legal requirement to pseudonymize a particular user, and pseudonymizing them just makes the Supervisors’ job harder. The Users to Exclude from Pseudonymization list lets Supervisors specify endpoint users whose data won’t be pseudonymized when viewed by other Supervisors.This action is available to users in the default Supervisors user group, to the built-in default admin user, and to tenant admins.
1
Open the Pseudonymization tab
Sign in as a Supervisor, the built-in admin, or a tenant admin. Click Configuration, then select the Pseudonymization tab.
2
Add a user to exclude
In the Users to Exclude from Pseudonymization section, click Add User. Pick the Computer and the User / User Group from the drop-down lists.
3
Confirm the addition
Click the Add icon to add the entry. Use the Edit or Remove icons later to modify the list.
4
Save
Click Save in the bottom right.
Related
Sensitive Data Masking
Mask specific data values (passwords, SSNs, credit cards) on the endpoint — pairs with Pseudonymizer.
Access requests
Where Expose Requests appear alongside other access requests for Supervisor approval.
Session Player
Where obfuscated captures and randomized identifiers are displayed.
Audit log
Every Expose Request and approval/denial is recorded in the audit log.