

Not available in SaaS. The Management Tool is only installed on-premises and in self-hosted deployments.
Before running the installer, complete the Management Tool prerequisites — IIS, .NET Framework, certificate, and HTTPS binding must be in place.
Install the Management Tool
The Management Tool setup wizard's Requirements screen — confirms IIS, .NET, and certificate prerequisites are in place before installation begins.
1
Run the installer
Run the
Syteca_ManagementTool.exe installation file. The Setup Wizard opens — click Next on the Welcome page.2
Accept the EULA
Read the End-User License Agreement carefully, then click I Agree.
3
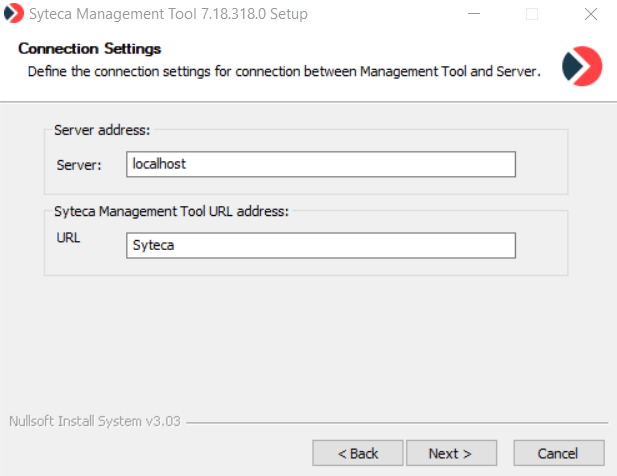
Configure the connection
On the Connection Settings page, fill in both fields, then click Next:
- Server — the name or IP address of the computer where the Application Server is installed.
- URL — the name of the IIS folder for the Management Tool. The default is
Syteca, and this folder name becomes part of the URL used to open the Management Tool.
4
Choose the install location
On the Choose Install Location page, click Browse to change the Destination Folder if needed, then click Install.
5
Finish
Wait for the Installing page to complete, then click Close. The Management Tool now appears as an application in the Default Web Site (or any other site with an
https connection) in IIS Manager.6
Open it
Open the Management Tool in your browser, from this computer or a remote one.
Allow remote access through the firewall
If users will open the Management Tool from computers other than the one where it’s installed, configure the firewall to accept inbound HTTPS. Skip this if all users will access the Management Tool only from the install host.1
Open Windows Firewall
In Control Panel, select System and Security → Windows Firewall, then click Advanced settings.
2
Create a new inbound rule
In the Windows Firewall with Advanced Security window, right-click Inbound Rules, then select New Rule.
3
Select the predefined HTTPS rule
On the Rule Type page, select Predefined, choose Secure World Wide Web Services (HTTPS) in the list, then click Next.
4
Confirm the predefined rule
On the Predefined Rules page, select the World Wide Web Services (HTTPS Traffic-In) checkbox, then click Next.
5
Allow the connection
On the Action page, select Allow the connection, then click Finish. The inbound HTTPS rule is created.
Update the Management Tool
When a newer version of Syteca is released, run the new Management Tool installer over the existing installation — your settings, configuration, and IIS binding are preserved.1
Run the new installer
Run the
Syteca_ManagementTool.exe installation file from the newer version.2
Select Update
On the The program is already installed page, confirm Update is selected, then click Next.
3
Follow the installer
Continue through the same steps as the initial install above.
Major releases sometimes have additional update considerations. Review the release notes for any breaking changes or required actions before updating.
Uninstall the Management Tool
1
Open Programs and Features
Open the Programs and Features window from Windows Control Panel.
2
Find and uninstall
Find the Syteca Management Tool application in the list. Right-click it and choose Uninstall from the context menu.
3
Wait for the Setup Wizard
The Setup Wizard opens and runs the uninstaller. When complete, click Close.
Related
Management Tool prerequisites
The IIS, .NET, and certificate setup to do before running the installer.
Management Tool basics
Open, sign in, and learn the interface after installation.
Smart card access
Optional: enforce smart card / PIV / CAC authentication for the Management Tool.
Release notes
What changes in each version, including update considerations.