

When detection isn’t enough — stop the activity in 15 seconds
Detecting an incident is necessary; stopping it is harder. Most monitoring tools alert you when a user does something forbidden — at which point the user is still doing it, and your security team has to manually call IT to disable the account, while the data is already on its way out the door. By the time the response chain completes, the damage is done. Some platforms support automated response, but they mostly require a separate SOAR product and a workflow that crosses two or three vendors. Syteca user blocking is the same idea, built into the same Client you’re already running. Block manually while watching a session in progress (with a 15-second warning the user sees on their screen), or configure any alert to automatically block on trigger. The user is forcibly logged out across all Clients, can’t log back in, and stays on the Blocked Users list until an admin manually removes them. No second product.Use Syteca user blocking when you need to:
- Cut off insider threats in real time — credential abuse, privileged data theft, evidence destruction in progress.
- Stop session-level incidents instantly while you investigate — no waiting on IT to disable the AD account.
- Build automated response into your alert rules — define what triggers immediate blocking (specific file uploads, prohibited applications, time-of-day violations) and have it happen without human latency.
- Enforce emergency access revocation for contractors, terminated employees, or compromised accounts across every Client at once.
- Document a complete incident-response audit trail — who blocked whom, when, why, and from which Client.
Blocking users requires the administrative Client Installation and Management permission. The Block User button is disabled for users already on the Blocked Users list and for administrators without this permission.
How blocking works
When you block a user — manually or via alert — three things happen:- A warning message appears on the user’s Client desktop (for live sessions), and the desktop is blocked.
- After a configurable forced-logout time (default: 15 seconds for live sessions), the user is forcibly logged out.
- The user is added to the Blocked Users list, either for the current Client only or for all Clients in the system.
The Blocked Users list is stored on the Application Server. When you edit the list, every Client receives the update immediately. If a Client is offline at the time, it doesn’t enforce blocking for new entries until the connection re-establishes — at which point it receives the latest list.
Block a user manually
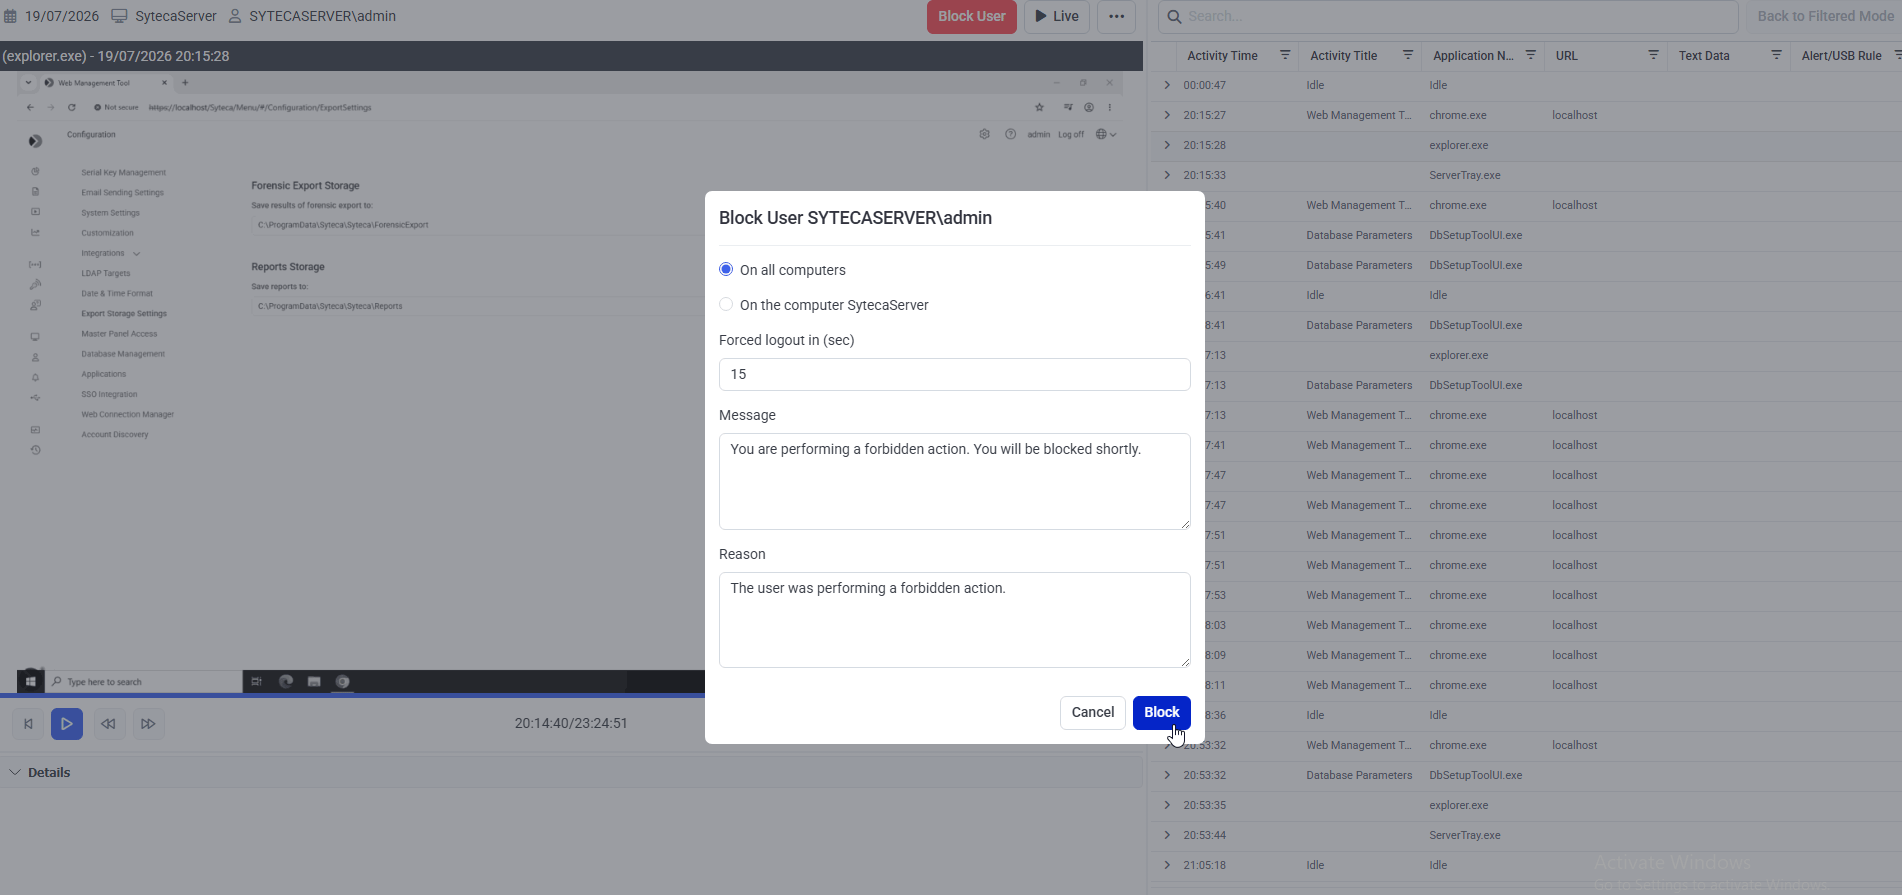
The Block User dialog from the live session — pick the blocking scope, set the forced-logout countdown, and optionally provide a custom message and reason.
- While viewing a live session
- While viewing a finished session
1
Open the live session
On the Activity Monitoring page, click the live session to open it in the Session Viewer.
2
Click Block User
In the main Session Player pane, click the red Block User button at the top.
3
Set the blocking scope and options
In the Block User pop-up, configure:
4
Confirm
Click Block. The warning message and blocked desktop appear on the Client immediately; the forced logout follows after the configured time.
Block automatically when an alert triggers
The more powerful pattern: configure an alert rule to automatically block the user the moment it triggers. No human latency — the response happens at machine speed.1
Open the Alerts page
Sign in to the Management Tool as a user with the Client Installation and Management permission, then click Alerts in the left navigation.
2
Add or edit the alert
Click Add Alert in the top right, or click the Edit Alert icon next to an existing alert.
3
Assign Clients
On the Edit Alert page, scroll to the Assigned Clients (or Assigned Client Groups) section and add the Clients the alert applies to.
4
Configure the warning
Scroll to the Actions section. Select Show warning message to user, and optionally edit the warning text shown to the user.
5
Enable automated blocking
In the Additional Actions drop-down, select Block user on all computers.
6
Save
Click Finish in the bottom right.
What the user sees on a secondary-authentication Client
If a Windows Client has secondary user authentication enabled, the system blocks the primary-secondary user combination, not just the primary user. The flow:- The user logs into the Client with their primary credentials normally.
- The Secondary User Authentication login window appears.
- The user enters their blocked secondary credentials.
- The system rejects the secondary credentials with: “You have been blocked. Contact your system administrator.”
The Blocked Users list
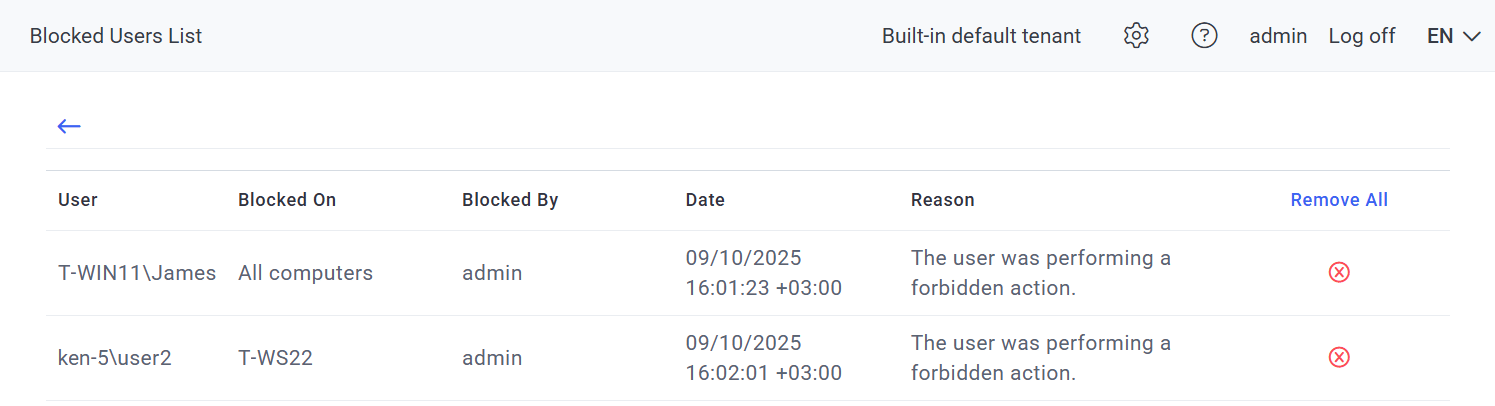
The Blocked Users list — central record of every block in effect, including the secondary-authentication primary(secondary) format and the Blocked By audit trail.
Open the Blocked Users list
Click Clients in the left navigation, then click the Clients drop-down arrow at the top of the page and select Blocked Users List from the menu.The grid
Unblock users
When the user is unblocked, they can immediately log back into Clients again.- Unblock one user
- Unblock all users
1
Find the user
On the Blocked Users list, find the row for the user.
2
Click Remove
Click the Remove icon next to the user.
3
Confirm
Click Remove in the confirmation message.
Related
Alerts
Define the alert rules that can trigger automated blocking.
Alerts events tab
Triage and update the status of every alert event.
Two-factor authentication
Secondary user authentication — how blocking applies to the primary-secondary combination.
Session Viewer
Where manual blocking starts — from the live or finished session you’re viewing.