

- Rotate a service account’s password without breaking every Windows service, scheduled task, or IIS pool that authenticates with it.
- Get visibility into which systems and services depend on a given privileged account before you touch its credentials.
- Discover and track Group Managed Service Accounts (gMSA) dependencies, even though gMSA accounts themselves are managed by Active Directory and can’t be onboarded.
1. Prerequisites
Dependency scanning needs specific permissions and components on each target computer, depending on what’s being scanned.1.1 Windows Services - grant “Log on as a service”
For Syteca to discover Windows services running under an account, that account needs the Log on as a service right on the target computer.- Local Security Policy
- Group Policy (multiple machines)
Open Local Security Policy
secpol.msc, press Enter.Navigate to User Rights Assignment
Open the policy
Add the account
LocalUser or DOMAIN\ServiceAccount), and click Check Names.Apply
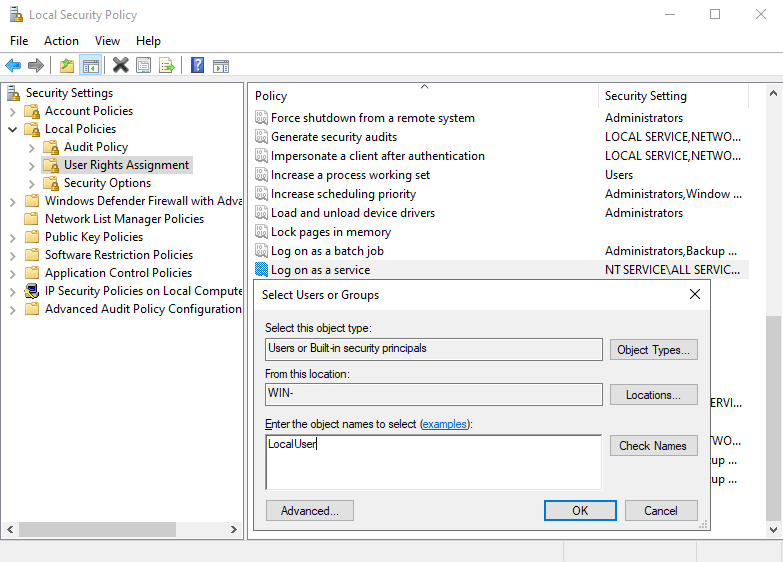
Adding an account to the Log on as a service right via Local Security Policy.
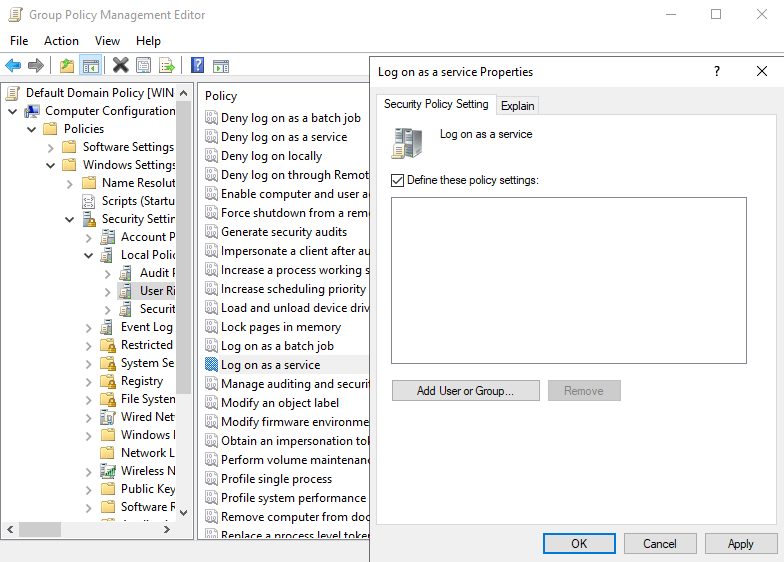
1.2 Scheduled Tasks - grant “Log on as a batch job”
For Syteca to discover scheduled tasks running under an account, that account needs the Log on as a batch job right.- Local Security Policy
- Group Policy (multiple machines)
Open Local Security Policy
secpol.msc, press Enter.Navigate to User Rights Assignment
Open the policy
Add the account or group
BackupUser or NT SERVICE\ALL SERVICES), and click OK.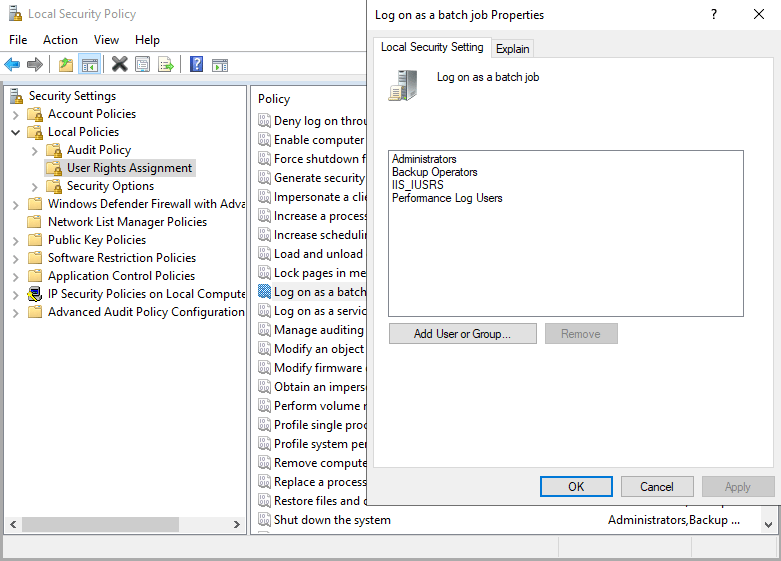
Adding an account to the Log on as a batch job right.
Apply
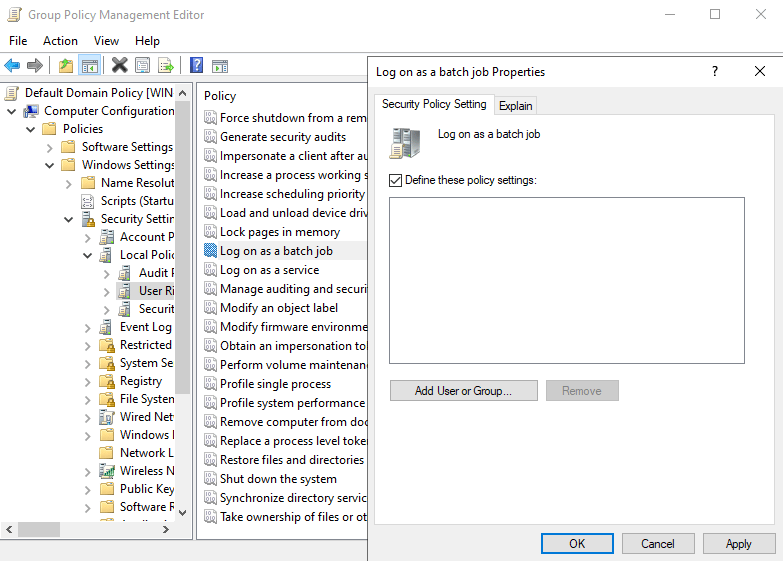
1.3 IIS Application Pools - prerequisites for WMI/PowerShell scanning
Enable IIS Management Scripts and Tools
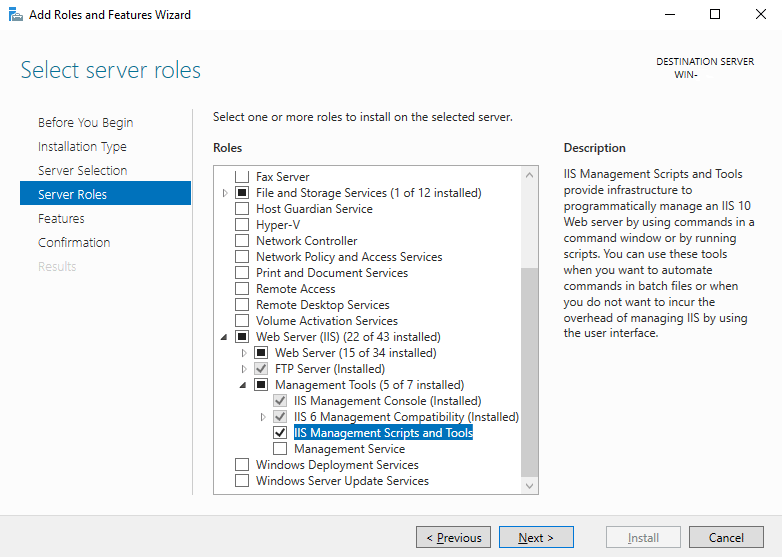
Enabling IIS Management Scripts and Tools in Windows Features.
Grant WMI namespace permissions for root\WebAdministration
Open WMI Control
wmimgmt.msc, press Enter.Open Properties
Navigate to the namespace
root\WebAdministration, select it, and click Security.Add the account
Grant permissions
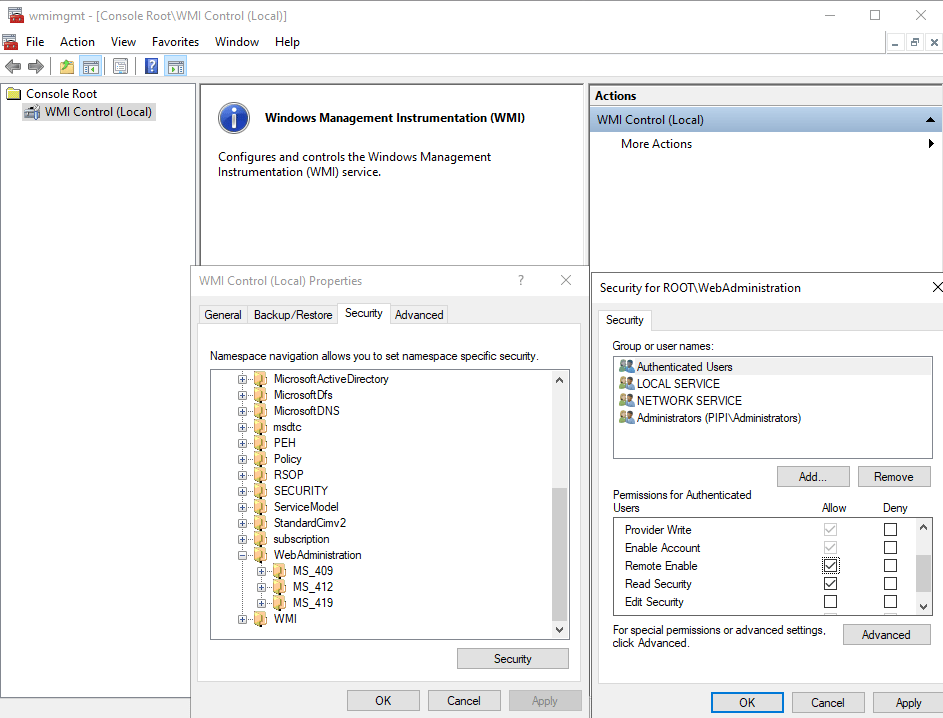
Granting Remote Enable and Execute Methods permissions on root\WebAdministration.
2. Configure discovery rules to scan for dependencies
When adding or editing an Active Directory Discovery or Computer Discovery rule, a Dependencies section controls whether the scan looks for services, scheduled tasks, and IIS application pools running under the discovered accounts.Open Account Discovery
Add or edit a rule
Select a supported rule type
Enable Dependencies
Choose what to scan for
Save
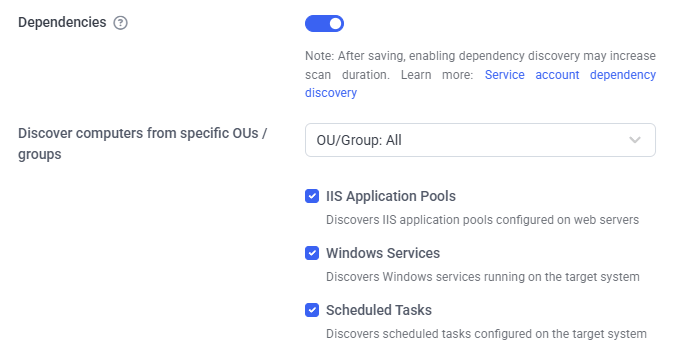
The Dependencies section of a Discovery Rule.
3. View discovered accounts and their dependencies
After a discovery rule with dependency scanning runs, discovered accounts appear on the Privileged Accounts tab. The Active Directory and Windows Local sub-tabs each gain a Dependencies column showing how many dependencies were found per account.3.1 Dependencies column
Shows the dependency count for each account. Clicking the count opens the Dependencies tab, filtered to that account.3.2 Dependencies filter
Filter Active Directory and Windows Local accounts by:- Has dependencies - accounts with at least one discovered dependency.
- No dependencies - accounts with none.
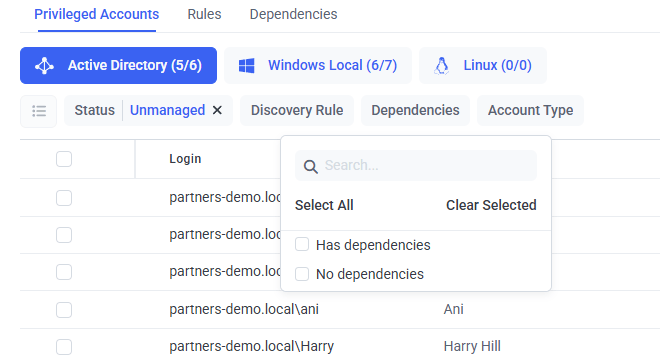
The Dependencies filter on the Privileged Accounts tab.
3.3 Account Type filter (Active Directory tab only)
Multi-select filter:- gMSA/sMSA account - Group and Service Managed Service Accounts only.
- AD user account - standard Active Directory user accounts only.
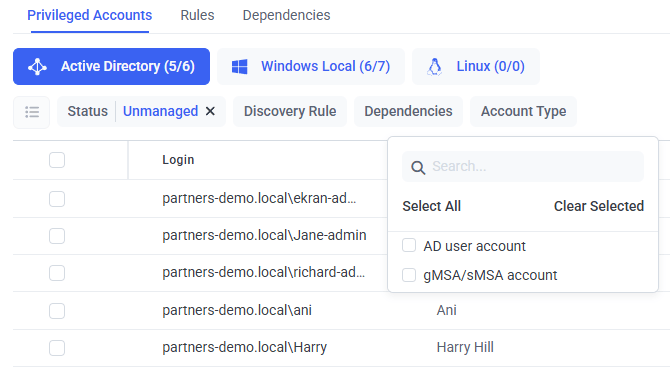
The Account Type filter on the Active Directory sub-tab.
3.4 Group Managed Service Accounts (gMSA)
Discovered gMSA accounts are marked with a dedicated icon in the Active Directory sub-tab. Hovering shows: “Group Managed Service Accounts (gMSA) are managed by Active Directory group policies and cannot be onboarded into Syteca.”4. Understand the Dependencies tab
The Dependencies tab on the Account Discovery page consolidates every dependency discovered across all rules, sorted by Discovered date (most recent first).4.1 Dependency statuses
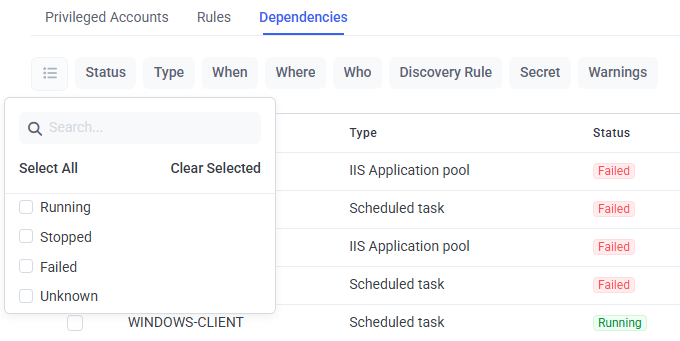
The Dependencies tab, with dependency statuses visible.
<date and time>”, updated automatically. Dependency checks run after discovery, after onboarding, after each remote password rotation, and automatically every 3 hours.4.2 Search, filter, and export
Search matches the Computer, Login, and Description columns (full or partial text).- CSV (All Fields) - every field, all pages, respecting applied filters.
- CSV (Current Fields) - only currently visible columns, all pages, respecting filters and column visibility.
DiscoveredDependencies_{localDate}.csv.
5. Onboard accounts with dependencies
Onboarding an AD or Windows local account that has dependencies shows a Dependencies section on the Properties tab of the Onboard Account popup.Open Account Discovery
Start onboarding
Complete the standard sections
Enable Dependencies
Choose the post-rotation behavior
Select the rotation secret
Onboard
6. View dependencies on the Edit Secret page
After onboarding an account with dependencies, its Dependencies tab appears on the Edit Secret page.Open the secret
Open the Dependencies tab
<date and time>.” The grid paginates at 50 records per page (not configurable), newest entries first. Last dependency status check (below the grid) shows the most recent check time for this account’s dependencies.6.1 Configure dependencies from the Automation tab
The Automation tab on Add/Edit Secret has its own Dependencies section - the same toggle and Restart/Stop after onboarding options - letting you change dependency handling for an already-onboarded account without repeating onboarding.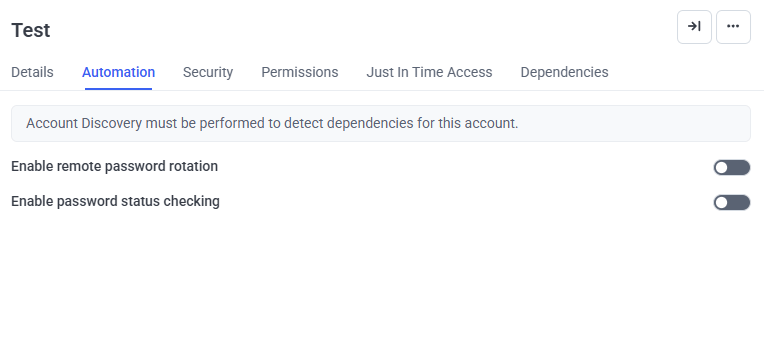
The Dependencies section on the Automation tab.
7. Onboarding workflow and retry logic
When an account with dependencies is onboarded - or remote password rotation runs for an already-managed account with dependencies - Syteca follows a structured workflow.7.1 Step 1: Password rotation and dependency management
Syteca rotates the service account’s password, then either:- Restart dependencies after onboarding - rotates dependency passwords, restarts each dependency.
- Stop dependencies after onboarding - rotates dependency passwords, stops each dependency.
7.2 Step 2: Reconciliation with a dedicated account
If Step 1 fails, Syteca automatically retries using the reconciliation account configured on Configuration → Account Discovery - typically a domain admin account.- Uses the first available reconciliation secret matching the account’s domain.
- Success stops the process there; failure tries the next secret from the same domain.
- Secrets from other domains aren’t used.
- Only one reconciliation attempt per rotation cycle, with a 10-second timeout between retries.
7.3 Step 3: When dependencies fail to restart
If dependencies still fail after reconciliation:- The Tasks List task is marked Finished with errors, naming the failed dependencies (for example, “‘Windows Service1’, ‘Windows Service2’ dependencies failed to restart. Manual intervention required.”).
- A System Health notification appears.
- The affected dependency’s status changes to Failed.
8. Manage the Exposed account status
If Syteca detects a new dependency for an account already in Managed status, the account automatically becomes Exposed - meaning its credentials may now be used by an additional, unsecured service or process. When this happens:- The account gets a dedicated Exposed icon on the Privileged Accounts tab (tooltip: “New unmanaged dependency detected using this account.”).
- The new dependency appears on the Dependencies tab with a warning icon.
- An email notification goes to the user defined in the discovery rule that triggered detection.
8.1 Resolve the Exposed status
Open the secret
Open the Automation tab
Enable Dependencies and choose behavior
Rotate
9. Group Managed Service Accounts (gMSA)
gMSA accounts are Active Directory accounts whose passwords Active Directory group policies manage automatically. Syteca can discover gMSA accounts (in the Domain Admins or Enterprise Admins groups) and their dependencies during Active Directory Discovery scans. Discovered gMSA accounts appear on the Active Directory sub-tab with a dedicated icon. Restrictions:- Can’t be onboarded through standard onboarding - the Onboard icon is unavailable, with tooltip “Group Managed Service Accounts (gMSA) cannot be onboarded. These accounts are stored as read-only.”
- Bulk Action > Onboard is disabled if any gMSA account is selected (alone or with regular AD accounts).
- gMSA accounts can be skipped via Bulk Action > Skip.
10. Upgrade from a previous version
Upgrading to a version with Service Account Discovery doesn’t automatically populate dependency information for accounts discovered before the upgrade.Re-run discovery rules
- If discovery finds dependencies for an account already Managed, that account automatically becomes Exposed.
- New dependencies appear on the Dependencies tab with a warning icon.
- To return the account to Managed, perform a remote password rotation for its secret with Dependencies enabled - see Resolve the Exposed status.