

Why is a Client displayed as offline?
If any or all Syteca Clients show as offline on the Clients page, the cause is usually one of the following.The Client was uninstalled, but its data is still displayed
The Client was uninstalled, but its data is still displayed
Isolation mode is enabled on the Application Server
Isolation mode is enabled on the Application Server
The Client computer is turned off
The Client computer is turned off
There's a network issue between the Client and the Application Server
There's a network issue between the Client and the Application Server
The connection port is blocked by a firewall
The connection port is blocked by a firewall
The EkranClient service is stopped, or doesn't start automatically
The EkranClient service is stopped, or doesn't start automatically
The Application Server's address changed, and Clients still use the old one
The Application Server's address changed, and Clients still use the old one
Not all Client sessions are displayed
If sessions are missing from the Client Sessions tab of the Activity Monitoring page, log in as a user with full administrative permissions and check the following, in order.Confirm the Client is online and licensed
Check whether settings are Custom or Inherited
Check for blocking recording settings
- User Activity Recording — confirm no restrictive checkboxes are selected. In particular, Record user activity only on alert or USB monitoring rule triggering means the Client only records when a rule fires.
- Filtering parameters (Application, User, Monitoring Time, Remote Host IP) — confirm no narrow include/exclude rule is unintentionally limiting what’s recorded.
- Keystroke logging — confirm no keyword-triggered monitoring rule is delaying recording start.
Check the Management Tool user's own access restrictions
- On Administrative Permissions and Client Access, confirm the required permissions are present to view the sessions in question.
- On User Access, confirm there’s no unexpected restriction limiting which endpoint users’ sessions this account can see. An empty table here means no restriction — every endpoint user’s sessions are visible.
Try another browser
Check the Client computer directly
Why can I only see old sessions, but not the latest ones?
This is most commonly caused by a lack of available database storage space.Clean up or archive the database
Enable scheduled cleanup (optional)
Define the Windows Client IP address with multiple NICs
Open Registry Editor on the Client computer
Navigate to the Client key
HKEY_LOCAL_MACHINE\SOFTWARE\EkranSystem\Client.Add the BindAddress value
BindAddress, and set its value to the IP address of the NIC you want the Client to use to connect to the Application Server.Restart the Client computer
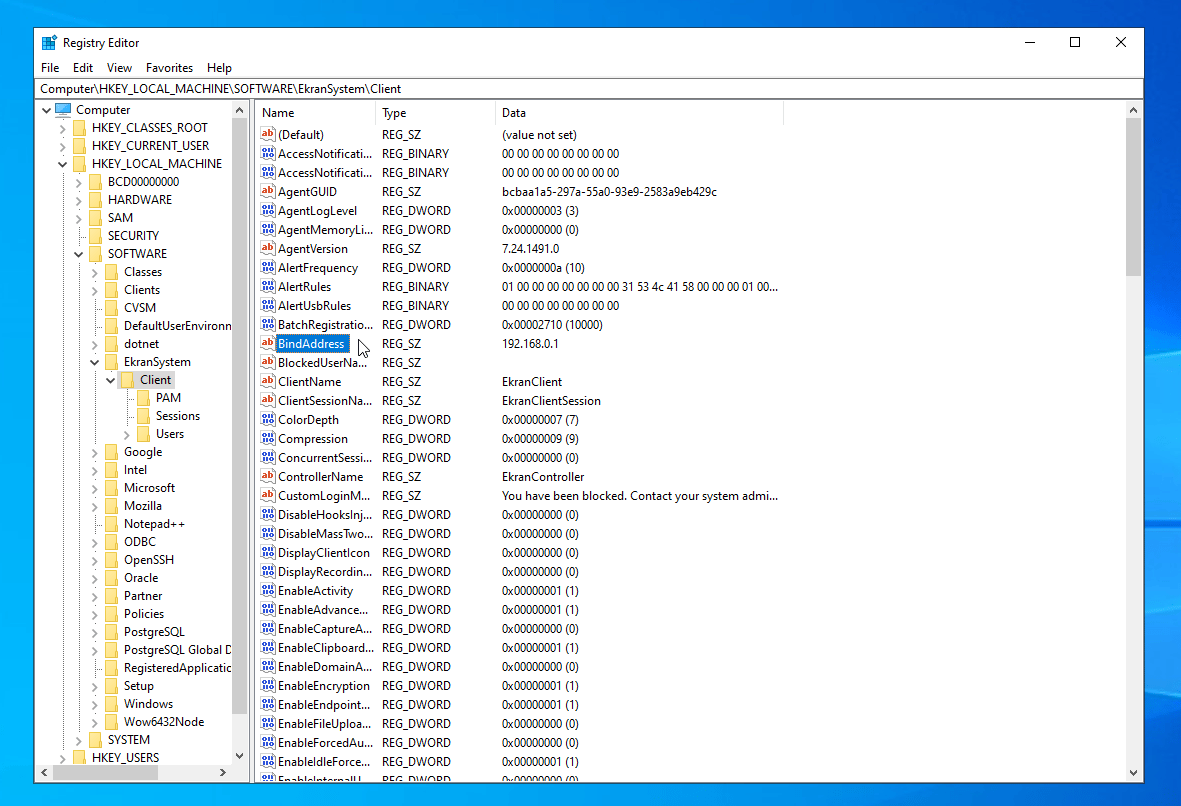
The BindAddress registry value set to a specific NIC's IP address.
Issues receiving data from Windows Clients
An installed Client isn't displayed online
An installed Client isn't displayed online
- Confirm the Client is installed and its services are running.
- Check for network issues: from the Application Server, run
ping <Client computer name>and resolve any problems found. - Confirm antivirus software isn’t blocking the Client’s processes or services.
I changed the Application Server computer's hostname
I changed the Application Server computer's hostname
Open Registry Editor on the Client
HKEY_LOCAL_MACHINE\SOFTWARE\EkranSystem\Client.Update the RemoteHost value
Reboot the Client computer
The Client is online, but sending no data
The Client is online, but sending no data
- Confirm user activity recording is enabled in the Client configuration.
- Confirm a license is assigned.
- Confirm at least 500 MB of free disk space on the Client computer.
- Confirm the database isn’t full (no free disk space where it’s stored).
An installed Client has stopped sending data
An installed Client has stopped sending data
- Confirm the Client’s processes haven’t been terminated.
- Confirm the EkranClient service is running.
- Confirm the Client computer is online with no network issues.
- Confirm antivirus software isn’t blocking the Client.
- Confirm no firewall is blocking the connection.
Issues receiving data from Linux Clients
An installed Client isn't displayed online
An installed Client isn't displayed online
- Confirm the Client is installed and running by checking its state.
- Check for network issues: from the Application Server, run
ping <Client computer name>and resolve any problems found.
The Client is online, but sending no data
The Client is online, but sending no data
- Confirm a license is assigned.
- Confirm sufficient free disk space on the Client computer.
- Confirm the database isn’t full (no free disk space on the database server).
An installed Client has stopped sending data
An installed Client has stopped sending data
- Confirm the Client is running:
- Confirm the Client computer is online with no network issues.
I installed a Client but can’t see it on the Clients page
Typically, the Application Server IP address or hostname provided during Client installation is incorrect.Check the configured address
HKEY_LOCAL_MACHINE\SOFTWARE\EkranSystem\Client\RemoteHost.Verify connectivity
USB monitoring doesn’t detect devices
If a Client with USB monitoring/blocking enabled doesn’t detect USB devices, check whether the USB drivers are installed:Check driver status
Install the drivers if missing
Reinstall the drivers if already present